PROTECTED SOURCE SCRIPT
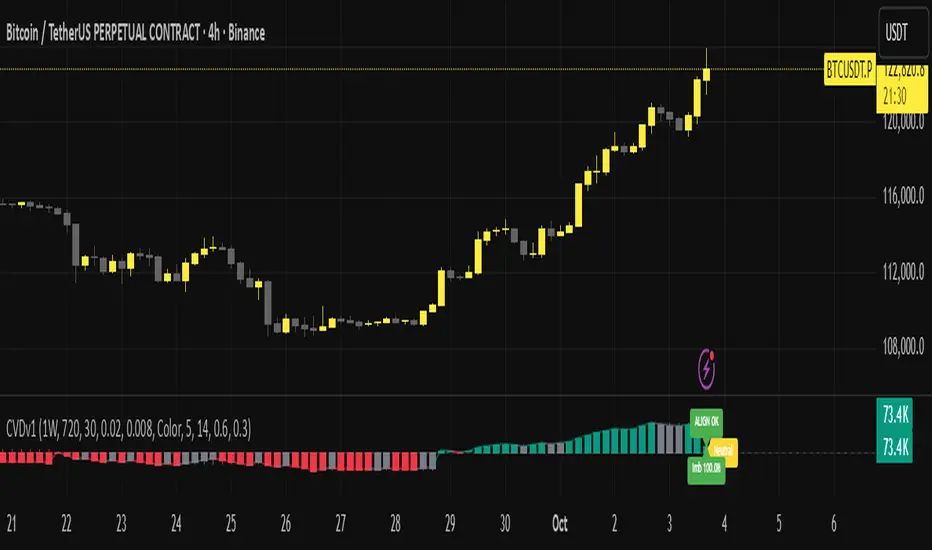
Cumulative Volume Delta v1 [JopAlgo]
anchor that represents the larger auction you respect, pair a faster anchor to police timing, and only act when the flow agrees at a meaningful level.
Scalping (chart: 1–5m)
A: 4H or 1H (defines the session you respect)
B: 30m or 15m
Use: only chase micro-breakouts when ALIGN OK, Imb% strong for the anchor, and Absorption ≠ red—at a level (POC/VA boundary/LVN or Weekly AVWAP test). Otherwise focus on reclaims after failed pushes.
Intraday (chart: 15m–1H)
A: 1D (default)
B: 8H or 4H
Use: bread-and-butter continuation/retest trades: ALIGN OK + Imb% ≥ strong + Absorption not red at VAH/VAL/POC or Weekly AVWAP.
Swing (chart: 2H–4H)
A: 1D or 2D
B: 8H–12H
Use: fewer trades, higher selectivity. CVD divergences at LVNs or Weekly AVWAP matter more; require ALIGN OK on the close that confirms the reclaim.
Position (chart: 1D–1W)
A: 1W
B: 1D or 12H
Use: ride weekly bias; only add on pullback→retest when Daily agrees. Lower the “strong” Imb% threshold (e.g., ~1–1.5%), increase warm-up.
No matter the timeframe, the decision rule doesn’t change:
Location first (trade at a level, not mid-air),
Alignment OK,
Imb% strong for your anchor,
Absorption not red on the trigger bar.
(If any of the four fail, wait for the next clean retest or a reclaim setup.)
Divergences and reclaims (the allowed exception)
CVD divergences matter at a level. A sweep below VAL/LVN or Weekly AVWAP where price makes a lower low but CVD makes a higher low is a classic bullish divergence. If Alignment isn’t red, you can take the reclaim on the close back inside the range—even if Imb% is only moderate—because location and flow structure are doing the heavy lifting. Mirror the logic for bearish at highs.
Pairing CVDv1 with other [JopAlgo] tools (optional, but powerful)
CVDv1 is fully compatible with:
Volume Profile v3.2 [JopAlgo] — objective where (POC, VAH/VAL, LVNs). These are your staging areas; let CVDv1 confirm when the push has quality.
Weekly AVWAP v3 [JopAlgo] — regime and mean-reversion anchor. Reclaims and divergences at Weekly AVWAP are some of the cleanest entries you’ll see.
If you use these: decide at the level, then consult CVDv1. ALIGN OK + Imb strong + no Absorption turns a good level into a high-probability timing signal. If Absorption is red at the level, that’s often your first hint to look for the failed breakout or reclaim instead.
Defaults that work out of the box
Keep Anchor A = 1D, Anchor B = 8H (or 480 minutes) to start. Imbalance “strong” around 2% (BTC/ETH), “neutral band” around 0.8%. Use the Color direction method first (simple and robust); switch to SlopeEMA if you want a smoother alignment on choppy symbols. Wick check on. Warm-up 15–30 minutes on daily; longer if you move to weekly anchors.
Common pitfalls this solves
Chasing a breakout into hidden sellers. Absorption turns red even while price pokes the level. That’s your cue to wait; many of those go on to become sharp fails.
Over-trusting a big raw delta. Imb% normalizes it. A huge raw delta on a huge-volume day can be mediocre quality.
Fighting the fast flow. ALIGN CONFLICT means the faster anchor disagrees with your main bias; don’t force it.
Open source & disclaimer
This indicator is intentionally open source so traders can learn, tweak, and build rules they trust. Markets involve risk; no single tool eliminates it.
Disclaimer — Not Financial Advice.
The “Cumulative Volume Delta v1 [JopAlgo]” indicator and this description are provided for educational purposes only and do not constitute financial or investment advice. Trading involves risk, including the possible loss of capital. [JopAlgo] makes no warranties and assumes no responsibility for any trading decisions or outcomes resulting from the use of this script. Past performance is not indicative of future results.
Use CVDv1 to filter and time; let your levels decide where, and let risk management decide how much.
보호된 스크립트입니다
이 스크립트는 비공개 소스로 게시됩니다. 하지만 제한 없이 자유롭게 사용할 수 있습니다 — 여기에서 자세히 알아보기.
@jopalgo | [JopAlgo] — Indicators & strategies. Clear rules, no chasing. Education only. Not financial advice.
면책사항
이 정보와 게시물은 TradingView에서 제공하거나 보증하는 금융, 투자, 거래 또는 기타 유형의 조언이나 권고 사항을 의미하거나 구성하지 않습니다. 자세한 내용은 이용 약관을 참고하세요.