OPEN-SOURCE SCRIPT
Merged: S&R Power + RSI Div Zones + Strategy
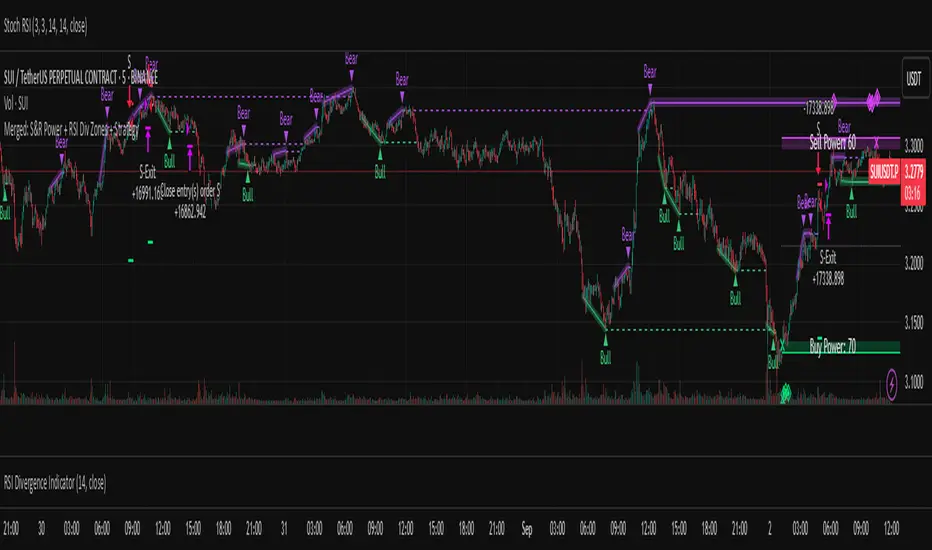
S&R Power + RSI Divergence Zones (ChartPrime) into a single, rules-based TradingView strategy. The goal: take a visually appealing idea and make it testable, configurable, and automatable — with explicit entries, filters, and exits.
Concept
• Module 1: S&R Power (zones + Buy/Sell Power, channel height).
• Module 2: RSI Momentum Divergence Zones (bull/bear divergence levels).
• Entry logic uses the latest divergence “zone” as the actionable price level, while Module 1 provides context/filters (power thresholds, channel height, optional confirmation).
Entries
• Long: when price tags the most recent bullish divergence level.
• Short: when price tags the most recent bearish divergence level.
• Optional “wait window” (in bars): if filters aren’t met immediately, the strategy can keep listening for a qualified entry for a limited time after the initial signal.
Filters (toggleable, per side)
• Touching Buy/Sell Power zones from Module 1.
• Optional “confirmation diamond” emulation from Module 1.
• Minimum Buy Power (for longs) / Minimum Sell Power (for shorts).
• Minimum channel height (%) to avoid trading inside very narrow ranges.
• Power difference threshold: (Buy − Sell) for longs, (Sell − Buy) for shorts.
Exits & Risk
• Separate TP/SL for longs and shorts (percent-based).
• Reaction to opposite signal while in position: None, Close, or Reverse (configurable per side).
• No pyramiding (pyramiding=0). Guide lines plot entry/TP/SL for clarity.
Repainting & Confirmation Notes
• Visual elements from Module 1 can repaint historically. This strategy avoids relying on repaint-prone shapes by (a) triggering on confirmed divergence levels from Module 2, and (b) gating entries with filters and a wait window.
• Divergence detection uses pivots and lookbacks; a divergence is considered only once it satisfies the lookback conditions (barstate.isconfirmed in the signal logic).
Inputs Overview
• Strategy Settings: TP/SL for long/short, guide line length, max guides, behavior on opposite signal (None/Close/Reverse).
• Filters & Waiting: wait bars after signal, power zone checks, confirmation option, power thresholds, channel height %, power difference thresholds.
• Indicator 1 — S&R Power: length, extend, colors.
• Indicator 2 — RSI Divergence Zones: RSI length, show divergence zones, number of stored zones, bull/bear colors.
How to Use
Add to chart on your desired symbol/timeframe.
Tune “Filters & Waiting” to your market conditions (e.g., increase channel height % to skip flat).
Set Buy/Sell Power thresholds and power difference to control selectivity.
Choose how the strategy reacts to opposite signals (None/Close/Reverse).
Adjust TP/SL per side, and set commission/slippage in Strategy Properties to match your venue.
Good Practice
• Forward-test in live conditions; do not rely solely on backtests.
• Commission/slippage matter; set realistic values in properties.
• Different assets/timeframes may need different thresholds for power and channel height.
Credits & Disclaimer
• Built on ideas from two ChartPrime indicators (S&R Power and RSI Momentum Divergence Zones). Not affiliated with ChartPrime.
• For educational purposes only. This is not financial advice. Trade responsibly with proper risk management.
오픈 소스 스크립트
진정한 트레이딩뷰 정신에 따라 이 스크립트 작성자는 트레이더가 기능을 검토하고 검증할 수 있도록 오픈소스로 공개했습니다. 작성자에게 찬사를 보냅니다! 무료로 사용할 수 있지만 코드를 다시 게시할 경우 하우스 룰이 적용된다는 점을 기억하세요.
면책사항
이 정보와 게시물은 TradingView에서 제공하거나 보증하는 금융, 투자, 거래 또는 기타 유형의 조언이나 권고 사항을 의미하거나 구성하지 않습니다. 자세한 내용은 이용 약관을 참고하세요.
오픈 소스 스크립트
진정한 트레이딩뷰 정신에 따라 이 스크립트 작성자는 트레이더가 기능을 검토하고 검증할 수 있도록 오픈소스로 공개했습니다. 작성자에게 찬사를 보냅니다! 무료로 사용할 수 있지만 코드를 다시 게시할 경우 하우스 룰이 적용된다는 점을 기억하세요.
면책사항
이 정보와 게시물은 TradingView에서 제공하거나 보증하는 금융, 투자, 거래 또는 기타 유형의 조언이나 권고 사항을 의미하거나 구성하지 않습니다. 자세한 내용은 이용 약관을 참고하세요.