OPEN-SOURCE SCRIPT
업데이트됨 Support and Resistance (MTF) | Flux Charts
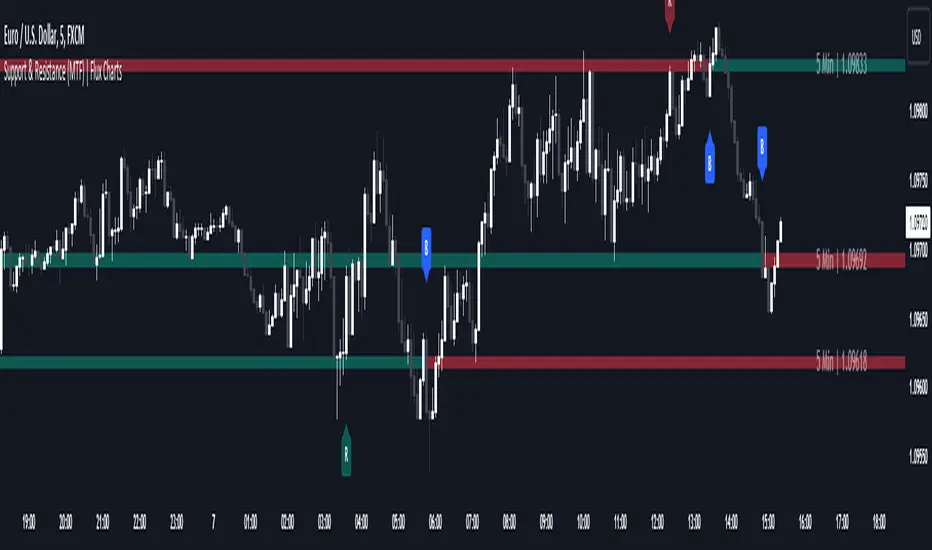
💎 GENERAL OVERVIEW
Introducing a groundbreaking support and resistance indicator designed to revolutionize your trading experience on TradingView! This innovative tool operates across three distinct timeframes, offering a comprehensive view of market dynamics to help you make informed trading decisions.
The indicator offers a large variety of features :
🚩UNIQUENESS
What sets this indicator apart is its ability to seamlessly integrate and analyze support and resistance levels across multiple timeframes simultaneously. By combining data from three different timeframes, this indicator provides a holistic perspective on market trends and key levels. The adaptive nature of this tool ensures a dynamic assessment of support and resistance zones, empowering traders to adapt to changing market conditions efficiently.
⚙️SETTINGS
1. General Configration
Support & Resistance Count -> Select between 1-3 support & resistance zones for each timeframe.
Pivot Range -> The pivot range is taken into calculations when finding high & low pivots in the chart. Increase if you need a more general look at the support & support zones, or decrease if you need a more detailed look.
Strength -> The strength of the support & resistance zones are determined by how many times the price touched the zone in the past. You can increase the strength up to 4.
Expand Lines & Zones -> If enabled, the support & resistance zones will be expanded to both left and right infinitely. If disabled, the support & resistance zones will be clamped between the time they are first seen, and the time they become broken.
2. Support & Resistance Zones
Enable Zones -> The support & resitsance lines will be converted to zones if enabled.
Zone Width -> The width of the zones. 1 -> %0.05, 2 -> %0.06, 3 -> %0.075.
3. Timeframes
Enable & Disable up to 3 different timeframes using the checkboxes. You can set the timeframes using the selectboxes.
4. Breaks & Retests
Show Breaks -> Points the break points with a blue label with the text "B" on it.
Show Retests -> Points the times when the support & resistance zones are being retested in the current chart.
Avoid False Breaks -> If enabled, the algorithm will try to avoid false break points by comparing the average volume of the point to a longer average volume.
Break Volume Threshold % -> If "Avoid False Breaks" option is enabled, the average volume of the break point should surpass the general average volume by this percent. Higher values mean it's less likely to be a break.
Inverse Color After Broken -> As broken support & resistance zones often become resistance & support zones respectively, if you enable this option the broken zones will inverse their color.
5. Alerts
To make the alerts work, you'll need to add an alert to the chart using the TradingView® alert feature.
Enable Retest Alerts -> You will receive alerts when restests happen on any of the support & resistance zones. "Show Retests" option needs to be enabled to get alerts of this category.
Enable Break Alerts -> You will receive alerts when breaks happen on any of the support & resistance zones.
Introducing a groundbreaking support and resistance indicator designed to revolutionize your trading experience on TradingView! This innovative tool operates across three distinct timeframes, offering a comprehensive view of market dynamics to help you make informed trading decisions.
The indicator offers a large variety of features :
- Select Up To 3 Timeframes
- Select Strength Of Supports & Resistances
- Select Between Zones & Lines
- Show Breaks & Restests
- Break & Retest Alerts
- Avoid False Breaks
- Inverse Color After Broken
- Expand Lines & Zones
🚩UNIQUENESS
What sets this indicator apart is its ability to seamlessly integrate and analyze support and resistance levels across multiple timeframes simultaneously. By combining data from three different timeframes, this indicator provides a holistic perspective on market trends and key levels. The adaptive nature of this tool ensures a dynamic assessment of support and resistance zones, empowering traders to adapt to changing market conditions efficiently.
⚙️SETTINGS
1. General Configration
Support & Resistance Count -> Select between 1-3 support & resistance zones for each timeframe.
Pivot Range -> The pivot range is taken into calculations when finding high & low pivots in the chart. Increase if you need a more general look at the support & support zones, or decrease if you need a more detailed look.
Strength -> The strength of the support & resistance zones are determined by how many times the price touched the zone in the past. You can increase the strength up to 4.
Expand Lines & Zones -> If enabled, the support & resistance zones will be expanded to both left and right infinitely. If disabled, the support & resistance zones will be clamped between the time they are first seen, and the time they become broken.
2. Support & Resistance Zones
Enable Zones -> The support & resitsance lines will be converted to zones if enabled.
Zone Width -> The width of the zones. 1 -> %0.05, 2 -> %0.06, 3 -> %0.075.
3. Timeframes
Enable & Disable up to 3 different timeframes using the checkboxes. You can set the timeframes using the selectboxes.
4. Breaks & Retests
Show Breaks -> Points the break points with a blue label with the text "B" on it.
Show Retests -> Points the times when the support & resistance zones are being retested in the current chart.
Avoid False Breaks -> If enabled, the algorithm will try to avoid false break points by comparing the average volume of the point to a longer average volume.
Break Volume Threshold % -> If "Avoid False Breaks" option is enabled, the average volume of the break point should surpass the general average volume by this percent. Higher values mean it's less likely to be a break.
Inverse Color After Broken -> As broken support & resistance zones often become resistance & support zones respectively, if you enable this option the broken zones will inverse their color.
5. Alerts
To make the alerts work, you'll need to add an alert to the chart using the TradingView® alert feature.
Enable Retest Alerts -> You will receive alerts when restests happen on any of the support & resistance zones. "Show Retests" option needs to be enabled to get alerts of this category.
Enable Break Alerts -> You will receive alerts when breaks happen on any of the support & resistance zones.
릴리즈 노트
- Option to change the color & opacity of displayed text
- Option to adjust the opacity of the zones & lines
릴리즈 노트
- Added a "Memory Optimization" setting for users that encounter memory limit errors using the indicator. It can be enabled from the advanced settings located at the bottom of the settings menu.
릴리즈 노트
Reworked retest calculation for more consistent result.릴리즈 노트
Improved upon zone strength calculations.릴리즈 노트
- Improved reliability of retest & breakout alerts
- Improved efficiency of "Avoid False Breakouts" option
릴리즈 노트
- Fixed a rare error that halts the indicator when using multiple timeframes.
릴리즈 노트
- You can now select between center & right for resistance and support text alignment
- You can switch zone size between fixed and dynamic, dynamic option has an ATR approach to zone size, and should be consistent across different timeframes
릴리즈 노트
- Thumbnail update
릴리즈 노트
릴리즈 노트
- Script is completely rewritten with new memory optimizations & bug fixes
릴리즈 노트
- Fixed a rare bug with break labels being incorrectly placed
릴리즈 노트
- Various fixes to "Inverse Color After Broken" setting.
Four things to keep in mind while using this script:
- Levels that are created using the "Inverse Color After Broken" setting are called ephemeral levels in the script.
- Ephemeral levels will not create another inverse zone after they are broken.
- Ephemeral levels are not taken into account when calculating strength of a level, for example an ephemeral zone created from a strength 2 S&R will be always strength 2, no matter the amount of retests.
- Any level invalidated in 5 bars after it's creation will not be rendered, ephemeral or not. This is implemented to prevent retest & break labels cluttering on the chart especially for ephemeral zones as they can be invalidated really fast unlike original S&Rs.
릴리즈 노트
Retest logic revised — Retests for higher timeframe support & resistance levels will be shown from the chart timeframe as well as their original timeframe.릴리즈 노트
Retest logic revised — Retests for higher timeframe support & resistance levels will be shown from the chart timeframe as well as their original timeframe.릴리즈 노트
- Fixed an issue where text would occasionally overlap
릴리즈 노트
- Fixed an issue where text would occasionally overlap
릴리즈 노트
- Fixed an issue that resulted in script throwing an error
릴리즈 노트
- NEW Zone Width setting to adjust support & resistance zone sizes
- Various Fixes To MTF Logic
오픈 소스 스크립트
트레이딩뷰의 진정한 정신에 따라, 이 스크립트의 작성자는 이를 오픈소스로 공개하여 트레이더들이 기능을 검토하고 검증할 수 있도록 했습니다. 작성자에게 찬사를 보냅니다! 이 코드는 무료로 사용할 수 있지만, 코드를 재게시하는 경우 하우스 룰이 적용된다는 점을 기억하세요.
Access Flux Charts' exclusive indicators: fluxcharts.com/
Join our Discord community: discord.gg/FluxCharts
Join our Discord community: discord.gg/FluxCharts
면책사항
해당 정보와 게시물은 금융, 투자, 트레이딩 또는 기타 유형의 조언이나 권장 사항으로 간주되지 않으며, 트레이딩뷰에서 제공하거나 보증하는 것이 아닙니다. 자세한 내용은 이용 약관을 참조하세요.