Price action and chart pattern trading setup:
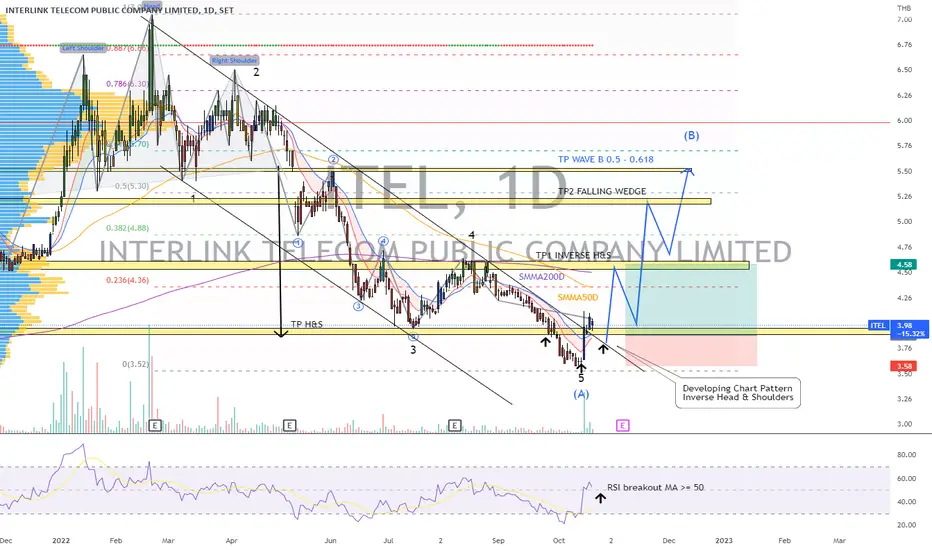
> A possible downtrend A-wave reversal zone at the 5-wave uptrend Head & Shoulders target
> Now breakout downtrend 5-wave channel and developing an Inverse Head & Shoulders reversal pattern below SMMA200D zone.
> If breakout successfully, A possible scenario for long entry, we could wait for price to retest its neckline.
> Target zone 1 - 2 - 3 as follows: Inverse H&S SMMA200 zone, bullish channel target, and B-wave targeting 0.5 - 0.618 retracement zone.
> Stoploss at inverse head & shoulders' head - 7 - 8%
> Risk reward ratio: 2:1 / 2.5:1 / 3:1 respectively
Always trade with affordable risk and respect your stoploss, nothing is 100%.
면책사항
해당 정보와 게시물은 금융, 투자, 트레이딩 또는 기타 유형의 조언이나 권장 사항으로 간주되지 않으며, 트레이딩뷰에서 제공하거나 보증하는 것이 아닙니다. 자세한 내용은 이용 약관을 참조하세요.
면책사항
해당 정보와 게시물은 금융, 투자, 트레이딩 또는 기타 유형의 조언이나 권장 사항으로 간주되지 않으며, 트레이딩뷰에서 제공하거나 보증하는 것이 아닙니다. 자세한 내용은 이용 약관을 참조하세요.