📊 EURNZD – Bearish Setup (H2 Chart)
Pair: EURNZD
Timeframe: 2H
Bias: Short Position
🔎 Market Context:
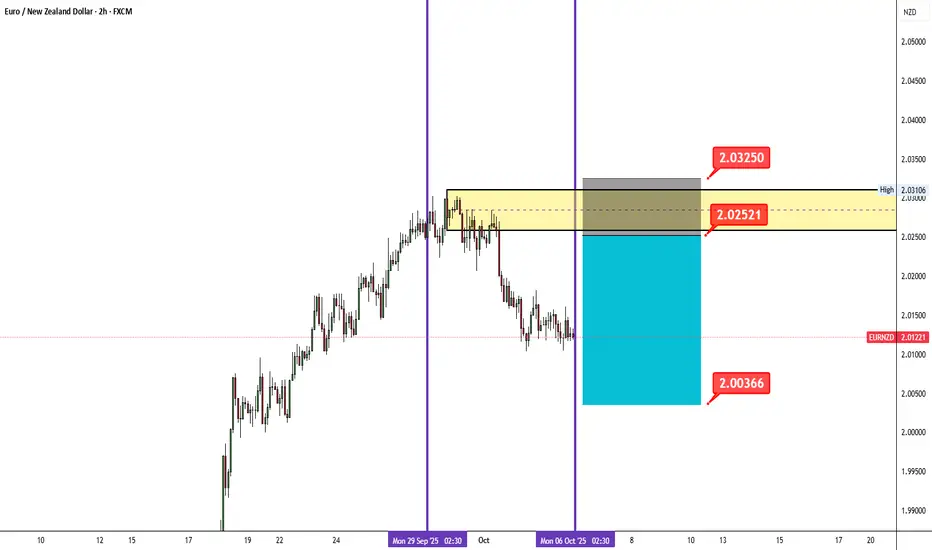
Price recently rejected from the 2.02521 – 2.03250 resistance zone.
Sellers appear to be stepping in as bullish momentum weakens.
Structure points to a possible continuation lower if rejection holds.
📌 Trade Plan:
Entry Zone: 2.02521 – 2.03250
Stop Loss (SL): Above 2.03250
Take Profit (TP): 2.00366 (previous support / liquidity area)
⚖️ Risk-Reward (RR):
Approx 1:3, aligning with weekly trade management.
📅 Setup valid for Oct 6 – Oct 10, 2025
⚠️ Disclaimer: This chart idea is for educational purposes only, not financial advice. Always manage risk before trading.
Pair: EURNZD
Timeframe: 2H
Bias: Short Position
🔎 Market Context:
Price recently rejected from the 2.02521 – 2.03250 resistance zone.
Sellers appear to be stepping in as bullish momentum weakens.
Structure points to a possible continuation lower if rejection holds.
📌 Trade Plan:
Entry Zone: 2.02521 – 2.03250
Stop Loss (SL): Above 2.03250
Take Profit (TP): 2.00366 (previous support / liquidity area)
⚖️ Risk-Reward (RR):
Approx 1:3, aligning with weekly trade management.
📅 Setup valid for Oct 6 – Oct 10, 2025
⚠️ Disclaimer: This chart idea is for educational purposes only, not financial advice. Always manage risk before trading.
면책사항
해당 정보와 게시물은 금융, 투자, 트레이딩 또는 기타 유형의 조언이나 권장 사항으로 간주되지 않으며, 트레이딩뷰에서 제공하거나 보증하는 것이 아닙니다. 자세한 내용은 이용 약관을 참조하세요.
면책사항
해당 정보와 게시물은 금융, 투자, 트레이딩 또는 기타 유형의 조언이나 권장 사항으로 간주되지 않으며, 트레이딩뷰에서 제공하거나 보증하는 것이 아닙니다. 자세한 내용은 이용 약관을 참조하세요.