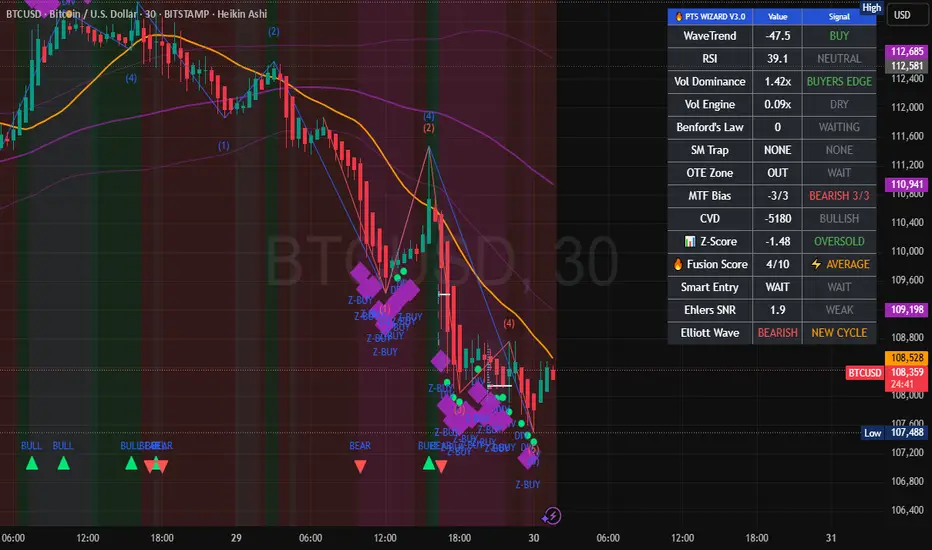
SHORT
Entry Price: 108,590 (limit on pullback)
Stop Loss: 108,840
Take Profit(s): TP1 108,200 · TP2 107,900 · TP3 107,500
Risk-to-Reward (RR): ~1.6:1 (TP1) · ~2.8:1 (TP2) · ~4.4:1 (TP3)
Asset: BTCUSD (3-min, Heikin Ashi)
Market Type: Crypto
Session (if visible): NY overlap
Rationale:
Structure: Clean intraday downtrend; price trades below fast & slow MAs with a sequence of lower highs/lows.
Smart Money / Flow: MTF Bias shows bearish 3/3; CVD deeply negative (strong sell) confirming dominant sell pressure; Vol Dominance favors sellers.
Momentum/Stats: WaveTrend sell, Z-Score & RSI oversold → expect reactive bounces; therefore prefer fade-the-bounce rather than chase lows.
Execution Logic: Enter on retest of the 108,560–108,650 supply/EMA pocket (fair-value gap fill from the impulsive drop). SL above the most recent LH/EMA cluster (108,840) to avoid noise.
Management: Reduce risk at TP1 (move SL to BE), scale at TP2, leave a runner to TP3 targeting the liquidity shelf below 107,600–107,500.
🔒 DISCLAIMER
This analysis is for educational purposes only and does not constitute financial advice. Trading involves risk. Always do your own research before making investment decisions.
면책사항
해당 정보와 게시물은 금융, 투자, 트레이딩 또는 기타 유형의 조언이나 권장 사항으로 간주되지 않으며, 트레이딩뷰에서 제공하거나 보증하는 것이 아닙니다. 자세한 내용은 이용 약관을 참조하세요.
면책사항
해당 정보와 게시물은 금융, 투자, 트레이딩 또는 기타 유형의 조언이나 권장 사항으로 간주되지 않으며, 트레이딩뷰에서 제공하거나 보증하는 것이 아닙니다. 자세한 내용은 이용 약관을 참조하세요.