BPCL | Based on Demand Zone and Elliott Wave Analysis
[1] Chart Overview
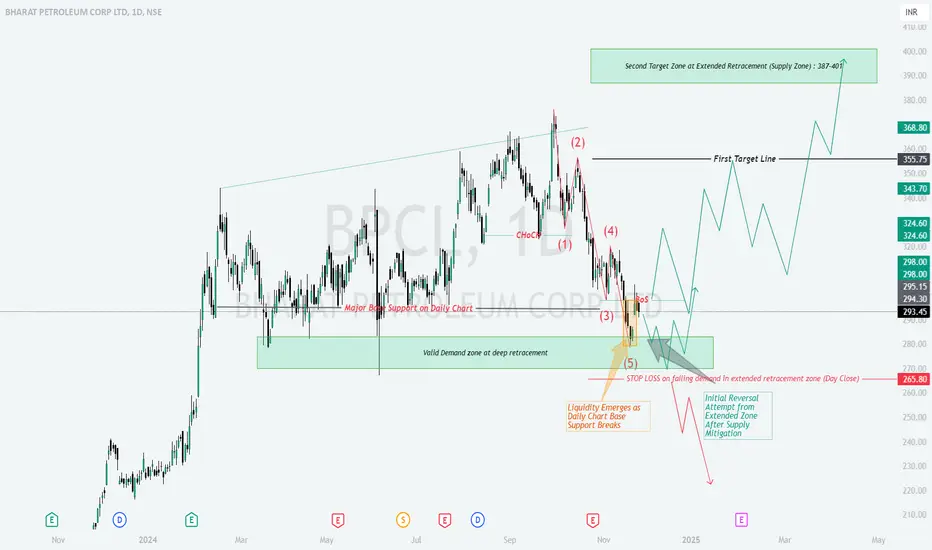
The chart highlights a completed Elliott Wave 5-structure, with price entering a Valid Demand Zone between ₹270-280.
A potential reversal setup is visible, targeting higher levels if price action confirms buyer strength.
[2] Analysis Breakdown
[3] Trading Plan
[4] Risk Management
[5] Educational Notes
Demand Zone Reversals: Demand zones often lead to significant reversals when combined with liquidity traps and bullish signals.
Wave 5 Completions: Wave 5 typically completes a trend, offering reversal opportunities.
Patience is Key: Wait for confirmation signals to improve trade probability.
Conclusion:
Bullish Plan: Watch for reversals in the ₹270-280 demand zone, targeting ₹343-355 and ₹387-400.
Bearish Plan: Short below ₹265 if the demand zone fails, targeting ₹240-250.
Stick to the plan, follow risk management rules, and allow the market to confirm your bias before executing trades.
Disclaimer:
I am not a SEBI-registered analyst. The above analysis is for educational purposes only. Please conduct your own research or consult with a financial advisor before making trading decisions.
[1] Chart Overview
The chart highlights a completed Elliott Wave 5-structure, with price entering a Valid Demand Zone between ₹270-280.
A potential reversal setup is visible, targeting higher levels if price action confirms buyer strength.
[2] Analysis Breakdown
- Key Zones to Watch:
Demand Zone (₹270-280):
A deep retracement zone with strong historical buying activity.
Liquidity likely emerges here after breaking the Major Base Support, trapping weak sellers.
First Target Zone (₹343-355):
Initial resistance where sellers may reappear after a reversal.
Second Target Zone (₹387-400):
Extended retracement supply zone where profit-taking is expected. - Elliott Wave Structure:
The current chart shows a 5-wave bearish structure:
Wave (1): Initial impulsive move down.
Wave (2): Weak corrective pullback upward.
Wave (3): Strongest wave breaking major supports.
Wave (4): Minor correction upward.
Wave (5): Final wave driving price into the demand zone.
Wave 5 completion often signals a potential trend reversal, aligning with this setup. - Confirmation Signals:
Price Action: Look for bullish reversal candlestick patterns (e.g., hammer, bullish engulfing) near ₹270-280.
Volume Spike: Increased buying volume in the demand zone indicates institutional interest.
Change of Character (ChoCH): Shift from lower lows/lower highs to higher highs/higher lows.
[3] Trading Plan
- Bullish Reversal Trade:
Entry: Near ₹270-280 upon confirmation of bullish price action or volume signals.
Targets:
Target 1: ₹343-355 (initial resistance).
Target 2: ₹387-400 (supply zone).
Stop Loss: Below ₹265 (invalidation of demand zone). - Bearish Breakdown Trade (If Setup Fails):
Logic: A daily close below ₹265 invalidates the demand zone.
Entry: Short position below ₹265 after a confirmed breakdown.
Target: ₹240-250 (next strong support zone).
Stop Loss: Above ₹270-275 (to avoid false breakdowns).
[4] Risk Management
- []Position Sizing: Limit risk to 1-2% of total capital.
[]Stop Loss Discipline: Strictly follow stop-loss levels to prevent emotional trading. - Risk-to-Reward Ratio: Aim for at least 1:2 or higher R:R ratio (risk ₹10 to target ₹20+).
[5] Educational Notes
Demand Zone Reversals: Demand zones often lead to significant reversals when combined with liquidity traps and bullish signals.
Wave 5 Completions: Wave 5 typically completes a trend, offering reversal opportunities.
Patience is Key: Wait for confirmation signals to improve trade probability.
Conclusion:
Bullish Plan: Watch for reversals in the ₹270-280 demand zone, targeting ₹343-355 and ₹387-400.
Bearish Plan: Short below ₹265 if the demand zone fails, targeting ₹240-250.
Stick to the plan, follow risk management rules, and allow the market to confirm your bias before executing trades.
Disclaimer:
I am not a SEBI-registered analyst. The above analysis is for educational purposes only. Please conduct your own research or consult with a financial advisor before making trading decisions.
면책사항
이 정보와 게시물은 TradingView에서 제공하거나 보증하는 금융, 투자, 거래 또는 기타 유형의 조언이나 권고 사항을 의미하거나 구성하지 않습니다. 자세한 내용은 이용 약관을 참고하세요.
면책사항
이 정보와 게시물은 TradingView에서 제공하거나 보증하는 금융, 투자, 거래 또는 기타 유형의 조언이나 권고 사항을 의미하거나 구성하지 않습니다. 자세한 내용은 이용 약관을 참고하세요.